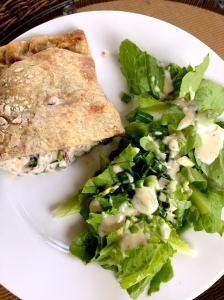
Asparagus and chard calzone

photo 2-4

My approach to CSA cooking is usually to try to use as few non-CSA ingredients as possible, since that helps you get the most bang for your buck from your CSA share. I don’t want to have to spend a lot of money on exotic ingredients to make fancy recipes on Epicurious or Pinterest, so I usually modify them to use what I have.

I wrote last year about how homemade pizza can be a CSA member’s best friend. You can find my go-to easy weeknight pizza dough recipe here. Tonight, I used half of that recipe to make this calzone, which I told my 3-year-old daughter, is just a pizza turned inside-out. You could use any store-bought pizza dough or your own favorite recipe to do this.

There is no need to be too exact with this. If you have sausage or mushrooms around, they would be great in here. You just don’t want to increase the total quantity of filling too drastically, so cut down on other ingredients before adding new ones. I would also recommend dividing your dough in half (or into parts small enough to make individual calzones) to make these neater and more hand-held. If you do this, divide your dough when you take it out of the fridge, because then each little piece will have time to come to room temperature and rise on its own. I made one big calzone, which came out fine, but I would have liked a little more crust on my piece.

Asparagus and Swiss Chard calzone

Ingredients:

1/2 recipe weeknight pizza dough (or enough of any other dough for a 12″ pizza)

1 tablespoon olive oil, plus more for brushing the crust

2 green onions, green and white parts chopped

2 cloves garlic, minced

1/4 teaspoon crushed red pepper

1/2 bunch Swiss chard, torn into pieces, stems separated from leaves and chopped finely, leaves chopped coarseley

1/2 pound asparagus, chopped into thin discs

3/4 cup ricotta cheese

3/4 cup shredded mozzarella cheese

2 tablespoons shredded parmesan cheese

1/4 teaspoon salt

1/4 teaspoon pepper

1/2 teaspoon dried Italian herbs (I like the frozen pizza mix from Penzey’s)


Make your dough or take pre-made dough out of the refrigerator in the morning, and let it sit at room temperature on a floured cutting board covered by a clean kitchen towel all day. Divide dough into desired number of pieces when you take it out and let each piece rest separately.

Heat oil over medium-high heat and cook onions and garlic with crushed red pepper until translucent, about 3 to 5 minutes. Add chard stems and cook another few minutes, then add chard leaves and cook until wilted. Allow this mixture to sit until it’s cool enough to handle. Gently squeeze as much liquid out of the chard as you can and place it in a bowl with the asparagus, cheeses, salt, pepper and herbs. Mix until well-blended.

When ready to make the calzones, preheat oven to 450 degrees. Line a large cookie sheet with foil and coat with cooking spray. Gently shape your dough pieces into circles about half a centimeter thick. It’s best to do this on your floured cutting board. Then place each piece of dough so that half of it lies on the cookie sheet and half flops off (or whatever arrangement you need to fit them all one one sheet, keeping in mind that the finished product will be folded in half). Lightly drizzle each dough round with olive oil (I find this makes for a crisper crust.).

Divide the cheese mixture among your dough rounds. Brush the border of each dough round with water, fold the empty half over and pinch to seal. Using a sharp knife, cut 2-3 holes in the top of each calzone. Brush each one with olive oil. Bake for 15 minutes, or until crust begins to brown and center is bubbly.

Allow to cool 3 to 5 minutes. Serve with a good marinara on the side.


Week 9: June 26, 2013

In this week’s box:

3 pounds of green beans

1/2 dozen eggs

3 pounds of potatoes

2 bunches of green onions

2 bunches of beets

2 bunches of swiss chard

14 ears of bicolor corn(white and yellow on the same cob)

1 head of broccoli

1/2 pint of raspberries

1 pint of blackberries

1 bag of tomatoes

Retail value of this week’s box: $46

Total retail value of goods distributed so far this season: $472

Emily’s notes:

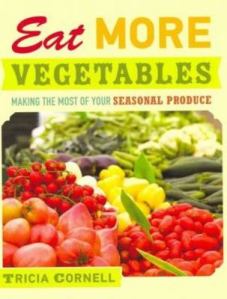
vegOn a recent trip to the library, I stumbled upon a cookbook that I think would make a great reference in any CSA member’s kitchen. It’s called, “Eat More Vegetables” by Tricia Cornell, and was published in 2012. Cornell, who lives in Minnesota, is a longtime CSA member. She writes about how the weekly box of produce was overwhelming for her for the first few years of membership, and she even dreaded CSA pickup days at times because of the volume that came into her kitchen. But over the years she developed rhythms and devised dishes that made it all a lot more manageable and enjoyable for her entire family. There are some really creative recipes in here that look like a lot of fun. I think I might have to make an exception to my self-imposed ban on buying new cookbooks to add this one to the home library.

When I picked up this book, I was thinking about beets, which also appear in this week’s box. Cornell’s recipe for Beet and Goat Cheese Tart looked intriguing to me. I’m going to be entertaining guests this week, so I might give it a try. Here it is:

Beet and Goat Cheese Tart

Serves 8 as an appetizer

1 pound beets

1/2 cup plain yogurt

1 egg

6 ounces goat cheese

1 sheet frozen puff pastry, thawed

olive oil

1 to 2 tablespoons honey (optional)

1 teaspoon dried sumac (This is a Middle-Eastern spice that Cornell says is optional, but adds a nice tartness.)

Wrap beets in foil and roast at 400 degrees until a knife slides easily all the way through (This took about an hour with the beets we got last week.). You want beets on the softer rather than firmer side for this recipe. Leave the oven on. Peel the beets under running water as soon as they are cool enough to handle. Slice them 1/4 inch thick.

Mix yogurt, egg and goat cheese. Place pastry on lightly floured or parchment-lined baking sheet. Brush very lightly with olive oil. Cover pastry with overlapping disks of beets, leaving about 1 inch around the edges. Spoon goat cheese mixture over the top, still leaving the edges clear. Drizzle with honey (I am thinking balsamic vinegar might be a good alternative here.) and bake 35 to 40 minutes, until edges are puffed and golden brown. Cool completely, then slice into 2-inch squares and serve.

If you’re looking for more beet ideas, the beet salad described in this post on the blog “Dinner: A Love Story” looks nice to me. I also might have to make this beet hummus that has been on my to-do list for years, but never seems to get made before I use my beets for something else. Like cake.

With onions, green beans and potatoes in this week’s box, you’re all set up to make a classic Southern side, green beans and new potatoes. This recipe from the blog Deep South Dish gives a good guide. I can smell the bacon now.

On a busy night, I sometimes like to roast my green beans. They don’t get as soggy, and the flavors of what you dress them in intensify a bit. The last time we got green beans, I roasted them after tossing them with a mix of sesame oil, soy sauce, rice vinegar and brown sugar, with a sprinkling of sesame seeds. This recipe for parmesan roasted green beans from the blog Skinny Taste looks like something I’ll have to try with this batch.

And the first corn of the season is here! Last year I discovered that the best way to get corn on the table quickly on a weeknight was to toss it in the microwave, husk and all, and cook for about 3 minutes per ear (exact time will vary based on your microwave’s power). Remove it with a potholder (It’s hot!) and hack off the end that was attached to the stalk. Then you should be able to shake the cooked ear of corn straight onto your plate without having to deal with those pesky silks. It’s not quite as good as roasting corn in an oven (also with husks on) or grilling it, but it’s pretty good for a quick weeknight technique, which is what I need most of the time these days.

You could combine fresh corn taken off the cob with chopped tomates and onions from this week’s box for a quick fresh salsa. Toss the mixture with a little olive oil, lemon or lime juice, salt, pepper and cilantro (if you like it). Dice some of the potatoes and serve them hash-brown style, and scramble a few of the eggs. Spoon your salsa over the potatoes and eggs and you have a really tasty dinner completely from your CSA box!

You can click the “Swiss Chard” tag at right to see all the recipes we’ve linked to for chard so far this year. I am thinking of using my pizza dough recipe to make a chard calzone this week. I’ll share the recipe if it turns out!

This far into the season, I’d love to hear your thoughts on this blog. Are the recipes useful? Do they fit your lifestyle? Are there vegetables that you need more ideas for? Please e-mail me here with your comments (I will specify that I am asking for comments about the blog itself. Questions about CSA pickup should be directed to the Sneads.)

Week 7: June 12, 2013

In this week’s box:

1/2 dozen eggs

2 pints sugar snap peas

2 quarts strawberries

1 bulb fennel

2 bunches Swiss chard

2 bunches of spring onions

1 bunch of dill

1 bunch of basil

3 pounds of string beans

1.5 pounds of red potatoes

1.5 pounds of white potatoes

1/2 pint of raspberries

1 head of Chinese cabbage

Emily’s notes:

Have you ever cooked fish in parchment, or en papillote, as the French say? This week’s box contains a lot of ingredients that would be well-suited to this easy and healthful cooking method.

Here is an easy step-by-step tutorial with pictures from Cooking Light on how to prep and fold the parchment packets, and below is a rough recipe for how to make the most of this week’s box in such a dish.

Fish and vegetables en papillote

4 salmon fillets (or other fish of choice)

Any combination of the following, depending on your preference:

3/4 pounds green beans, rinsed and trimmed

1/2 pound small red potatoes, sliced about 1/8 inch thick

1 fennel bulb, thinly sliced

10 fresh basil leaves and/or 2 tablespoons chopped fresh dill

one lemon, sliced

4 teaspoons capers, rinsed and drained

salt and pepper to taste

4 teaspoons olive oil

drizzle of white wine (optional)

To ensure your vegetables cook all the way, you might want to blanch them first (fennel and potatoes 2 minutes, green beans one minute) in boiling water, then shock them in ice water to stop the cooking. While they’re in their ice bath, arrange each fish fillet on one of your prepared parchment “heart” halves and sprinkle with salt and pepper. (If using potatoes, you might want to put the potatoes down first as a bed.)

Next, layer fennel, green beans, then capers, herbs and a lemon slice or two for each packet. Drizzle each package with olive oil and white wine, if using, before sealing.

Place packets on a sheet pan and bake at 400 degrees for about 20 minutes. Serve immediately. Maybe saute some Swiss chard with a chopped spring onion to eat as a side dish.

When I see potatoes and dill, I immediately think of this potato salad recipe from the Barefoot Contessa, Ina Garten. I’ve made it too many times to count, it’s always a winner. Even though I think red onions add a great heat to this salad, you could definitely use the spring onions in this week’s box instead.

Speaking of Ina, she also wrote this recipe for Potato-Fennel gratin that would also be good with this week’s box. I am confident you could get away with using just one fennel bulb here, and the spring onions you’re getting this week instead of a yellow onion, as the recipe calls for (I usually use my spring onions in the same manner I would use mature onions, so it’s one less thing I have to buy during CSA season.).

If you’re looking for a new way to use Swiss chard, give this recipe for Swiss Chard Spanakopita a go. I did something similar with beet greens last year. It worked well as a freeze-ahead meal, also.

With Chinese cabbage, a recipe that has always been a hit in our house is this one for a salad that includes ramen noodles and a cider vinegar dressing. This is excellent for pot lucks.

It’s a real treat to have strawberries and raspberries in the same box. Celebrate by buying some premium vanilla ice cream and spooning on the fruit!

Midweek recipe: greens and beans (and whatever else) soup

photo-8

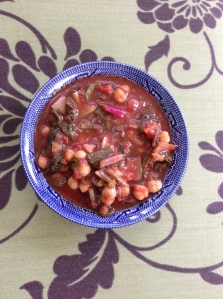
If your Memorial Day weekend was like mine, you came home from a few days on the road to a refrigerator drawer full of CSA vegetables you still needed to use. My kohlrabi were still rolling around in there, and my Swiss chard was starting to look tired. I woke it up with a soak in cold water, and then got started on one of my favorite vehicles for using the produce that threatens to go bad on us before we can use it: soup.

The recipe below is not the product of repeated fine-tuning in a test kitchen (though it is tasty). It is offered as an example of how you don’t always need a recipe to concoct tasty, economical dishes that will make the most of your CSA share.

A couple of notes:

  • I used a small amount of water in this soup. It came out thicker than most of my soups, and I kind of liked that, but you could use more water to give it a more traditional soup consistency. I also think that pureeing a bit of it, with the chickpeas included, and then pouring the puree back in with the rest of the soup would enhance the texture.
  • You could use chicken stock in place of water. A little wine wouldn’t hurt, either.
  • One of the things I like about soup for CSA cooking is that you can freeze it. Package it up in plastic containers or bags in portions you will use later on.
  • You will see CSA items from two different weeks in this recipe. Beet greens would work in this recipe (I usually prefer the whole beets on their own rather than mixed with a lot of other things in soups, but you could also use them in the same way the kohlrabi is used here.)

CSA drawer soup

1 green garlic plant, bulb and neck chopped finely

1/2 teaspoon red pepper flakes

2 tablespoons olive oil

1 bunch Swiss Chard, plus the greens from 4 kohlrabi, plus the greens from one beet, washed and chopped into small pieces (I kept the stems with the greens for this.)

2 kohlrabi, peeled and diced

1 28-ounce can crushed tomatoes

the empty can’s worth of water

2 cups chickpeas

In a Dutch oven or other large lidded pot, saute garlic and pepper flakes in the olive oil over medium heat until the garlic parts soften.

Add greens a few handfuls at a time and allow them to cook down. Salt them lightly as you add them. It helps to use tongs to toss the greens and garlic to make sure everything cooks evenly.

Add the kohlrabi, tomatoes and water. Bring to a boil, then turn the heat down and simmer for about 20 minutes. You want to make sure the kohlrabi cooks to a pleasant texture.

Add the chickpeas and cook until warmed through. Serve now or freeze for later. This would be great with a drizzle of olive oil and a sprinkle of parmesan cheese and some crusty bread.


Week 4: May 22, 2013

A note to our members: If you have been receiving the CSA information via e-mail, please be on the lookout (and check your spam folders) for an administrative message that contains a confirmation link that will allow you to keep receiving these messages via a private mailing list. As always, this information will also be broadcast via Facebook, Twitter, and this blog each week. 

In this week’s box:

2 bunches of swiss chard

2 heads green leaf lettuce

4 kohlrabi

2 cucumbers

1/2 dozen eggs

4 garlic scapes

2 lbs asparagus

2 pints sugar snaps

2 quarts strawberries

Emily’s notes:

Garlic scape - Image from Wikipedia

Garlic scape – Image from Wikipedia

This week introduces a new product to the Snead’s Farm CSA–garlic scapes. Scapes are curly stalks that emerge from garlic plants a few months before the bulbs are ready. They need to be cut to allow the plant to concentrate its energy into the garlic bulb. In recent years, they’ve become quite a gourmet sensation.

You can use them as you would regular garlic, though if you are cooking them, be sure to use considerably more, because the flavor is milder, and gets even more so as the scapes cook.

You can also use them like spring onions, chopping them raw into salads, tossing whole scapes on the grill or blending them up into pestos or salad dressings. This post from Serious Eats has a good-looking recipe for garlic scape pesto, along with several other ideas. This post from a garlic farm in Connecticut, also has some good ideas.

Another newcomer to the box this week is kohlrabi. To me, this is the quintessential CSA vegetable–something you might never have picked up at the market on your own, but that can really stretch your home cooking repertoire in tasty ways. Kohlrabi is in the cabbage family. It looks like an alien spaceship, which could be a good attribute if you’re trying to market it to your toddler. Get past it’s odd appearance, though, because with a little creativity, kohlrabi can serve a lot of purposes in your kitchen.

If the leaves are still attached, break them off and cut away the tough stems. The leaves can be eaten raw in salads or blanched or sauteed for other dishes. Last year, I made a kohlrabi pesto from the leaves. With this box, I might combine kohlrabi leaves with the garlic scapes in a big batch of spring-green pesto, which will freeze well until you want to use it in a big pasta dish with juicy summer tomatoes in a few months.

But with those wacky-looking kohlrabi bulbs, the key is in how you cut them. First, you will want to take a paring knife or your vegetable peeler and remove the tough outer layer of these bulbs. After that, here are some ideas:

  • Cut them into chunks that will fit your food processor, use the shredding blade and you’ll have the makings of kohlrabi cole slaw. Here is a full recipe for one version of that dish. Another tasty idea with kohlrabi shreds is to mix them with shredded apple, add a drizzle of lemon juice, olive oil, salt and pepper for a tangy side salad.
  • Cut them into planks and add them to your favorite stir-fry recipe (see below).
  • Cut them into french-fry sized pieces and make this New York Times recipe for baked kohlrabi home fries.
  • Dice them, toss with olive oil, salt and pepper and any other flavors you like, and roast them at 450 degrees for 20 minutes or so. This can be a side dish on its own, or the beginning of another dish, like this kohlrabi curry from Tasty Kitchen.

Another treat coming your way this week is the year’s first sugar snap peas. These are delicious for snacking. If you’ve never eaten these before, you will want to remove the strings by grabbing the pointy cap at the top of the pea and tugging it down the side so that a thin stringy vein comes out. Then you can pop them in your mouth, plunge them into your favorite dip or ready them for any number of recipes. Below I have shared a stir-fry recipe that will use both your kohlrabi and your snap peas.

Snap pea and kohlrabi stir fry

Ingredients

2 bulbs kohlrabi, peeled and cut into thin planks about 2 inches long and half an inch wide

2 pints sugar snap peas, washed and strings removed

2 tablespoons vegetable oil

2 tablespoons grated ginger

2 cloves minced garlic

4 tablespoons soy sauce

2 tablespoons rice vinegar

1 heaping tablespoon brown sugar

2 teaspoons sesame oil

3 tablespoons sesame seeds

Heat oil over medium-high heat. Add ginger and garlic and cook for about 30 seconds, until you can smell them. Add kohlrabi and snap peas and cook for about 3 minutes.

Add soy sauce, vinegar and sugar. Stir to mix and let liquids cook down a bit. You don’t want to cook so long that the vegetables lose their bright green color.

Remove from heat and drizzle with sesame oil and seeds. Serve alone or over rice.

*The asparagus and the garlic scapes from this week’s box would also work in this recipe. Just chop them into one-inch lengths and sub them in for a quantity of the vegetables here.

Week 3: May 15, 2013

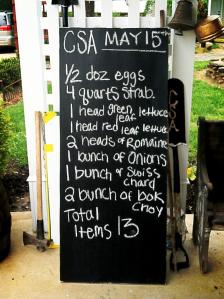
In this week’s box:

15board

Emily’s notes:

More delicious strawberries are headed your way this week! Here’s a simple recipe I found in a brochure put out by the Virginia Department of Agriculture and Consumer Services for strawberry butter. This butter is great for muffins, bagels, pancakes, biscuits and fresh homemade bread.

Strawberry Butter

2 cups fresh strawberries

1 stick butter, softened

1 cup powdered sugar

Place everything in a mixing bowl and blend until smooth and creamy. Refrigerate in an air-tight container.

There are a lot of greens in this week’s box, but don’t think that needs to mean that all your meals should look the same. The lettuce is obviously going to make a lot of great salads and sandwich toppers, but don’t limit its uses in your kitchen. Ditch the carbs and save money on bread by making lettuce wraps. Fillings could include your favorite chicken salad, hummus, taco meat, burrito fillings, etc. I have my eye on this slow cooker carne asada and these Thai beef lettuce wraps (which would also use some of your onions)…decisions, decisions!

If you’re feeling really adventurous, use some of your eggs in this recipe for Vietnamese pancakes. This is kind of a savory cross between an omelet and a crepe that is served lettuce-wrap style at Spotsylvania’s Pho Saigon restaurant. This would probably be especially good with Bok Choy. (I also just noticed that the June/July issue of “Fine Cooking” magazine – on newsstands now,photo-6has a beautiful spread on Korean barbecue that suggests serving the various chicken, beef, rice and vegetable dishes with red or green leaf lettuce leaves in wrap form. This spread also includes recipes for a number of other items you’ll find in your CSA box over the course of the season, including radishes and cucumbers.)

A classic use of Romaine lettuce is Caesar salad. Lucky for you, you also have farm-fresh eggs to add to the dressing. Here is Julia Child’s take on Caesar salad, a labor of love. For a little bit easier take on this classic, here is Tyler Florence’s version.

You’ve seen Swiss chard before, and I’d love to hear how you enjoyed it (e-mail me here). Last year, I made this chard, sausage and white bean soup several times, and it’s definitely a winner. But I also love chard for egg dishes like frittatas and quiches. If you’ve never made your own pie crust for quiche, you are missing a treat. It’s so much tastier than those store-bought crusts, more like a biscuit than a cardboard crust. I’m not going to say it’s any lower in fat, but it lacks the preservatives and (if you use all butter) the trans fats found in many commercial crusts. Here is a recipe for Swiss chard and onion quiche that I made during the first week of Snead’s CSA pickup. It looks long, but I swear, it is not that difficult.

IMG_1359Swiss Chard and Onion Quiche

for the crust:

2 cups all-purpose flour (I often substitute 1/2 cup of this with white whole-wheat flour. It makes me feel better about the butter.)

1 teaspoon salt

2 sticks cold unsalted butter, diced

1/2 cup ice water

for the filling:

1 tablespoon olive oil

2 spring onions, white and green parts chopped

1 bunch Swiss chard

6 eggs

1/4 cup milk, cream, half-and-half or plain yogurt

salt and pepper to taste (and any herbs, such as chives, thyme or parsley, that you happen to have)

2 oz goat cheese

make the crust:

This can be done ahead of time, as this dough will freeze well for several months.

Place the flour, salt and butter in the bowl of a food processor fitted with the steel blade. Pulse until butter is broken up a little smaller than pea-sized pieces. With the machine on, pour the ice water into the feed tube. Allow machine to run until dough just begins to ball up in the bowl.

Dump this very loose dough onto a well-floured work surface. Knead it lightly, and gather it into one big ball. Cut this ball in half, shape each half into a disc and wrap them separately in plastic wrap. Refrigerate at least two hours, or up to 2 days, or freeze for several months.

When you’re ready to make quiche, remove dough from refrigerator about 15 to 20 minutes before you want to work with it. Roll it out on a floured surface until it’s big enough to fit your pie dish (I use a standard Pyrex dish). Allow extra to hang over the sides, and tuck it under so it fits the dish, then use your fingers to make ridges. Or just forget about all that, cut off the extra, sprinkle it with cinnamon sugar, give it a twist or roll and bake it up into makeshift pastries in the oven with the pie (These will cook faster than the quiche.).

make the filling:

Separate the green chard leaves from the colored stalks. Tear the leaves into 1 to 2-inch chunks and set aside. Finely chop the stalks.

Heat oil in a skillet over medium-high heat. Add onions and chard stalks and saute until translucent. Add chard greens and a couple small pinches of salt. Saute until the greens cook down.

While this mixture cooks, mix eggs with milk, salt and pepper to taste and chopped herbs, if using. Whisk well until mixture is of uniform color.

Spoon greens mixture into prepared pie crust. Pour egg mixture over this, taking care to spread it around the pie dish. Top with crumbled goat cheese. Bake at 375 degrees for 30 to 45 minutes, or until quiche is solid. Allow to cool at least 10 minutes before cutting.

A quick note: The same great vegetables you’re enjoying in your CSA box are also being used in many local restaurants. Kybecca’s take on Snead’s asparagus was recently featured by a Northern Virginia Magazine food blogger. Find the post here.